
Introduction

Certain feeds, such as heat-sensitive, high-boiling, or easily oxidized feeds, go bad under standard atmospheric boiling. Short Path Distillation under vacuum allows for boiling point separation at much lower temperatures.
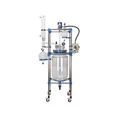
Because of this,a simple distillation apparatus like TDS-100Lis used in many laboratories for quick purification and recovery. In this guide, you will install the system, connect the vacuum, set up the heater and stirrer, and collect the fractions with confidence. You will achieve a stable window quickly with the sequence: assemble → hook up vacuum → heat & stir → distill → collect → shutdown & Care.
key Takeaways
- Simple Short Path Distillation (TDS-100L) allows you to vacuum distill high-boiling, heat-sensitive materials without boiling them, achieving much greater purification.
- Installation and sealing: clamps must be level, and PTFE gaskets properly designed to accept thin vacuum grease on all ground joints. Correct DN25/125# connections must be made to ensure a tight vacuum and smooth flow.
- Fill oil/water bath→ power on→ set temp→ low rpm stir→ suck slowly→ stabilize and collect (Start in this sequence).
- Safely shut down: stop stirrer → temp controller → cooling → off → vent to atmosphere and then free joints.
- Reliable operation: When supervising, never dry-heat the bath, clean and remove all residuals after each run, and ensure seals are lubricated and cleaned regularly to improve and maintain the reliability of the unit.
The simple distillation apparatus (TDS-100L) installation & hookup - step-by-step
Frame & bath in place
- As shown in the picture, put the frame together and fasten the fixed brackets for the setup.
- Before the bath is put on the brackets, place a PTFE support ring on the bottom of the bath.

Boiling flask & stir bar
- Place the magnetic stir bar in the reaction flask.
- Use the double-head clamp and make sure the setup is level.

Distillation bend, receiver, and seals
- Attach the distillation bend to the flask and secure it with the special clamp.
- Put the 50 L receiver on its support ring and make sure the top glass outlet is horizontal.
- At the keyed joints, insert PTFE gasket(s), then secure the clamp. Use vacuum grease on all ground joints.

Condenser, drain valve, spare port
- Put PTFE gaskets between the condenser and main unit, and the condenser and receiver.
- Use the condenser tie rods and clamps to adjust the condenser. The main unit and receiver can then be left-right symmetric to each other.
- At the receiver bottom, the drain valve is clamp-mounted, then we proceed to the DN25 glass flange.
- Attach the 125# multifunction port with a PTFE plug and fit the spare-port valve on the flask.

Vacuum gauge & pump
Put the vacuum gauge on the top of the receiver frame. Connect the vacuum gauge to the pump inlet so the vacuum gauge can measure the pump's rear ports. Before evacuation, lock the four casters on the main unit.

Sensors & control box
Insert the PT100 reactor internal temperature sensor into the thermometer sleeve port, and connect the other end to the dedicated socket at the rear of the electrical box.

Startup & operation - heating, vacuum, stirring
1. Startup
- Fill the bath with water or heat transfer oil that is heated to the target temperature.
- Electric power should be turned on.
2. Solvent Heating Temperature Control Instrument

Key Definitions
1)【SET】Setting key. In the main interface display state, press this key to enter the temperature and time target value setting state. Press and hold this key for 3 seconds to enter the internal parameter setting state.
2) ![]() Shift/Auto-Tuning key. In the setting state, press this key to shift and flash the setting value for modification.
Shift/Auto-Tuning key. In the setting state, press this key to shift and flash the setting value for modification.
In the main interface display state, press and hold this key for 6 seconds to enter the temperature auto-tuning selection state.
3) ![]() Decrease/Restart Key. Press or press and hold this key in the setting state to decrease the set value incrementally.
Decrease/Restart Key. Press or press and hold this key in the setting state to decrease the set value incrementally.
In the main interface, display state with operation completed, press and hold this key for 3 seconds to restart the operation.
4) ![]() Increase/Lock Screen Key. Press or hold this key in setting mode to increment the set value.
Increase/Lock Screen Key. Press or hold this key in setting mode to increment the set value.
If the lock screen function is selected, press this key on the main interface display to lock or unlock the screen.
3. Magnetic stirring control
- It is best to allow time for the assembly to be technical and control to minimize vibration and wear on the seals. Run the system, then STOP to switch the target rpm to the target range for a liquid surface.
4. Start the collection with distillation.
- Apply the vacuum evenly, then set the bath to hold a constant temperature for gradual, gentle evaporation.
- Monitor the level in the receiver. The DN25 drain head serves the purpose of discharging liquid. The outlet must be level horizontally, and the top plane must be low.
5. Shutdown order
- After the reaction is complete, please shut down the magnetic stirrer control instrument, the temperature control instrument, and the main power switch in sequence.
Safety & maintenance checklist 
Pre-use checks & sealing
- Check the glass for any cracks and make sure the ground joints fit properly; clean them, then put a little vacuum grease on them.
- Use PTFE valves and don't over-tighten them to protect the glass from damage.
Prohibited items
- The simple distillation apparatus requires attended operation.
- Heating the heater without solvent is strictly prohibited, as it may damage the heater's functionality.
- Prolonged high-temperature operation is strictly prohibited, as it may demagnetize the magnetic components.
Routine cleaning & seal care
- Remember to wipe off the oil and solvent marks on the glass and metal parts after each run.
- To help keep them working for longer, make sure to loosen the PTFE stopcocks after you've shut something down.
- For O-rings and gaskets, keep them moist and sealed by cleaning and applying vacuum grease every so often.
FAQ
?")
Common Problem
Which feeds are most suitable for a simple distillation apparatus
(Simple Short Path Distillation)?
Feeds that have high boiling points, and are thermal and oxygen sensitive, like flavors, vitamins, and fine-chemical intermediates, will benefit more from operating under vacuum and having short residence times. Thus, thermal load is reduced and clean fractions are obtained.
What are the components of the TDS-100L simple distillation apparatus?
A circulating heater/chiller, vacuum pump + gauge, and PTFE gaskets and support rings. For tasks with a high solvent content, water-ring or recirculating water vacuum pumps are durable and cost-effective. For targets with high boiling points, use oil-sealed pumps with cold-trap protection.
What can the TDS-100L simple short path distillation be used for?
Separating heat-sensitive compounds. Purifying organic synthetic substances. Extracting isolation active compounds from biological materials. Recycling industrial waste. Eliminating toxic contaminants from food. Deodorizing and decolorizing organic compounds. Removing residual solvents from compounds.
Certificate


Why choose us
Are you prepared to confidently operate the TDS-100L simple distillation apparatus? Reach out to us for the printable Standard Operating Procedure (SOP) for this straightforward short path distillation set-up.
Our team of process engineers is available to discuss your desired temperature, vacuum level, and feed properties. We will customize the heating/cooling and vacuum systems to meet your specific objectives and provide recommendations on materials and safety.
To explore other short path distillation options, please visit our website. ⇒
one-stop solution
professional team
high quality
Evaluation of stirring performance for a 100L simple short-path distillation apparatus